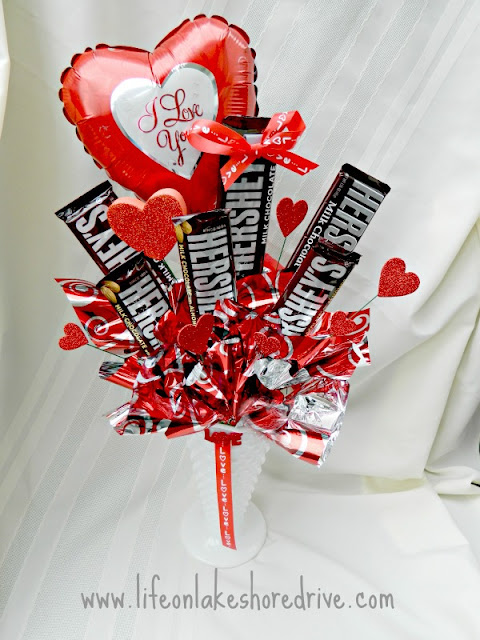
The best thing about this project is that it can be used for any occasion!
Here's what you will need for this project:
a vase
floral foam
skewers
floral wire
wire cutter
tape
tissue paper
candy bars
hearts or decorations
First, cut the foam to fit the vase.
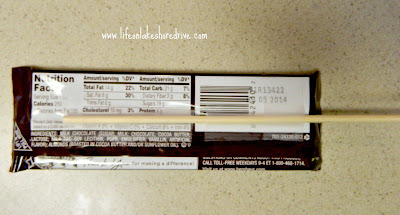
Tape the skewers to the back of the candy bars.
Randomly place the candy bars in the vase.
Cut the tissue paper into large squares, fold in half, and gather at the base, and wrap the floral wire around the end piece. I used different squares, and made the squares larger at the back to fill in the middle.
Just keep wrapping and filling until you have covered the entire piece of foam. Now you are ready to add the little extra Valentine touches.
Here it is before I added the little heart balloon. I taped the hearts on floral wire and placed them in the vase. I decided against a bow, so I just used the love sticker to add the ribbon.
We will be celebrating our anniversary at the end of this month. I wanted to get married on Valentine's Day, but my husband wanted us to have our own special day. So, now I have to come up with 2 gifts every February! I made this printable using PicMonkey to give him on our anniversary. We are huge Lionel Richie fans, and this just seemed perfect for the occasion. It sums up my wonderfully, blessed marriage. :)


21 comments:
Happy Valentines Day Kathy. The arrangement is bright and lively. I love Lionel too.
How lovely, that would make a nice gift for anyone. I am stopping by from the blog hop! Find me at fitandbeyond40.com
How sweet project!!!
Have a fabulous Valentine's Day!
Hugs from Portugal,
Ana Love Craft
www.lovecraft2012.blogspot.com
Kathy, all your creations are so beautiful! you give me inspiration with your projects. Thanks for following my blog, now I'm following you here. You have a beautiful blog!
Marisa from
http://passionetcouture.blogspot.ca/
Oh, boy would my grandkids love this one! It's adorable....Happy Valentine's Day!
Hugs,
Janet
Here from the blog hop and loving this post!! Into my fav DIY folder it went; can't wait to see what else you share. BB2U
Such a cute idea! =)
Happy Valentines Day!
Happy Valentine's Day! Great idea. My hubbie would love this! I am sharing vintage Valentine's Day cards today. Stop by for a visit!
Many blessings from Still Woods Farmhouse
So Cute Kathy! I wil have to remember this one for next year!
Hey, I'm a new follower! Found you at the GYFBH! I totally dig your blog layout, so simple and pretty!
I'd love it if you can follow me back :)
xoxo
ochibernadas.blogspot.com
This is so sweet, Kathy! Love your stuff! Linda
What a cute idea!Even as a birthday gift too!
Hope you had a wonderful Valentines day!
xx
Anne
Your post has been used as an example in my article, "How to Make Gift Baskets Like a Pro"
http://littlemomprairie.blogspot.com/2013/02/make-gift-baskets-like-pro.html
Super fun and cute! I've seen these around...but had no idea how they wee made. I'm pinning the tutorial for the future. Thanks sooo much, Kathy!!
Happy Belated Valentine's Day!
~Diane
http://anextraordinaryday.net/
Great idea, Kathy! I gave my hubby a "manly" bouquet, but yours is much prettier!
I made one of these last year for my BF for Valentine's Day, but I filled my (clear) vase with M&Ms. The weight of the candy kept making my sticks spin around the wrong direction. It seems that the foam is the key!
Very cute, Kathy! Thanks for sharing how you made this. I saw your post over at Coastal Charm. Happy Anniversary!
Kathy, I'm thrilled to let you know that I've nominated you for a Versatile Blogger Award!! You can check out the post where I nominated you, linking to your fabulous blog, at: http://chattingoverchocolate.blogspot.com/2013/02/receiving-and-bestowing-honor-of.html ...Congrats! Have a terrific night!! :)
Brenda
ChattingOverChocolate.blogspot.com
Great idea for any special occasion! So pretty too! Thanks for sharing at Simple & Sweet Fridays.
Jody
Ok I'm just a little late commenting.
I sure do wish I would have seen this earlier, I could have made one for my grandsons teacher. This is such a cute idea.
New to the hop! Thanks for the link-up. I've put your button on my pinterest page.
Post a Comment